Welcome to setting up your brand new bullet journal! 2020 was a rough year to say the least but a new year is upon us and if you're looking to make some changes, then a bullet journal is a fantastic way to start!
For those of you who may be new- welcome! I'm so glad you found your way to my wonderful little website! My name is Madison and I am a blogger & bullet journaler ready to help you along as you embark on your bullet journal journey. And for those of you returning to my blog, welcome back, let’s get right into it!
Settings up a new bullet journal is one of my absolute favorite things to do! A new year is another chance to reach goals, get organized, and just start fresh! In the post below I will detail how I have set up my own 2021 bullet journal along with links and steps to guide any newcomers as they go!
I will always include pictures, materials, and processes in my future bullet journal-related posts which will reveal my themes and page layouts for each month. That way, if you're someone looking for inspiration or for direction on how to get started, this blog will always be a good place to look. If you ever have any questions that aren't answered in the blog-you can always ask in the comment section below.
First thing's first, getting a good bullet journal notebook.
My 2021 Bullet journal will be my fourth completed bullet journal, which also means that I have had four years to figure out my style. I know what I like and dislike, what worked for me and what didn't. The first thing I figured out was what kind of journal works for me. My very first journal was small—an electric blue dotted journal that I picked up from a craft store willy-nilly. After all, it was my first time and I really didn't know what I was getting myself into. The following year I picked out a similar sized notebook—a black 5”×8” Jarbo journal. I was at least a bit more choosy with the brand and quality of the journal whose pages boasted a thickness that wouldn’t allow ink bleed through. My third year I decided to try something different. While on a trip to my local Walmart, I came across a much larger dotted notebook—a black Exceed 7”x9.5”. The size, the page count, and the space this book gave me was game changing. Now I swear by these notebooks. I even bought a few extras to use as notebooks for classes when I was still in college. So that is your first step as a new bullet journaler…
1. Find out your notebook preference


There are however, tons of different kinds of notebooks available for bullet journalers: lined, dotted, blank, big, small, colorful, patterned, etc.
But, I always knew that I wanted to use a dotted journal. After doing some Pinterest searches related to bullet journals, I noticed that the majority of the notebooks used were dotted, and that made sense. Bullet journaling requires a lot of quickly and evenly spacing shapes to create page layouts as well as the need to duplicate those layouts multiple times. So, having a dotted journal meant, for me, that I could quickly set up my pages, draw relatively straight lines and know that I could repeat that effort on the next page, all without pulling out a ruler. Obviously whatever kind of notebook you choose will take some feeling out and getting used to; that part, unfortunately, comes from experience, but doing some browsing beforehand doesn't hurt...
Here is a link to my personal Bullet Journal Pinterest Board and feel free to follow me there for more inspiration!
The next step of setting up your bullet journal is to find out what kind of journal you want in order to set up general page orders.
2. Research bullet journals to figure out how you want your journal laid out
There are loads of ways to use your bullet journal—as a planner, a dream journal, a diary, a habit tracker, or any combination of these! My journals are primarily based in calendar form. I start a new one in January every year and follow the calendar year to the next. But I also add in pages where I can be creative, track my habits, and remember the good times through the year. At the end of every year I have a whole notebook filled with reflections on the past year. That is something I adore about my bullet journal.
Pinterest is my number one place to go when it comes to bullet journal page inspiration and I would advise anyone starting their own to first look at a few bullet journal examples.
I also have pictures from the last two journals I completed on my website under "Bullet Journal."
While you are browsing Pinterest or looking at my previous pages, take note of the kinds of materials creators are using for their pages. There is nothing more frustrating when you’re attempting to create a page layout and you find that you don’t not have the utensils you need.
Some classic bullet journal utensils/materials may include:
1. A reliable black pen: I like Pilot G-2 .O5 mm or Uni-ball Vision fine tipped
2. Shuttle Art dual tipped brush markers: in lots of colors
3. Ruler or strait edge: yes, I know I said I didn't use rulers but really I just never want to have to use one, but when it comes to making crisp lines, like in my movie tracker pages, a ruler or something to provide a straight edge is always nice to have on head.
4. Washi Tape: This one is a material some journalers love and some don't use at all...I always loved how people incorporated the colorful tape in their journals and then I went a bit overboard buying tape and now I have a large collection I can display in the beginning at my journal.

5. Pretty scrap paper: I am a big fan of collaging and incorporating it in my journals. The scraps can come from anywhere-cut out of magazines, pulled out of old pages, collected from papers or pamphlets or, my favorite, picked out of old books from antique markets.


Once you have collected your materials, you are ready to move on to step 3:
3. Plan your journal pages
I advise planning because I am a person who doesn’t like to ‘mess up’ my journal, or the order of my journal’s pages. In my planning, I like to use sticky notes to assign each page a design, that way if I decide to add something else in or end up needing another page, I can easily shift the notes down. Below you can see that this page will eventually be my Washi Tape Collection.

Now that you have assigned ideas for your journal’s pages, it’s time to start actually creating your page layouts!
4. Create journal page layouts
Typically, I start my journal with a year-long calendar overview, including important dates, birthdays, anniversaries, and holidays. This year I went for a simple black ink design, I used both a Pilot G-2 .05mm pen and a Uni-ball vision fine tipped black pen for this.

Other people might start with a key or even a table of contents to really keep themselves organized, here are some examples on Pinterest and then an example of one I created myself.

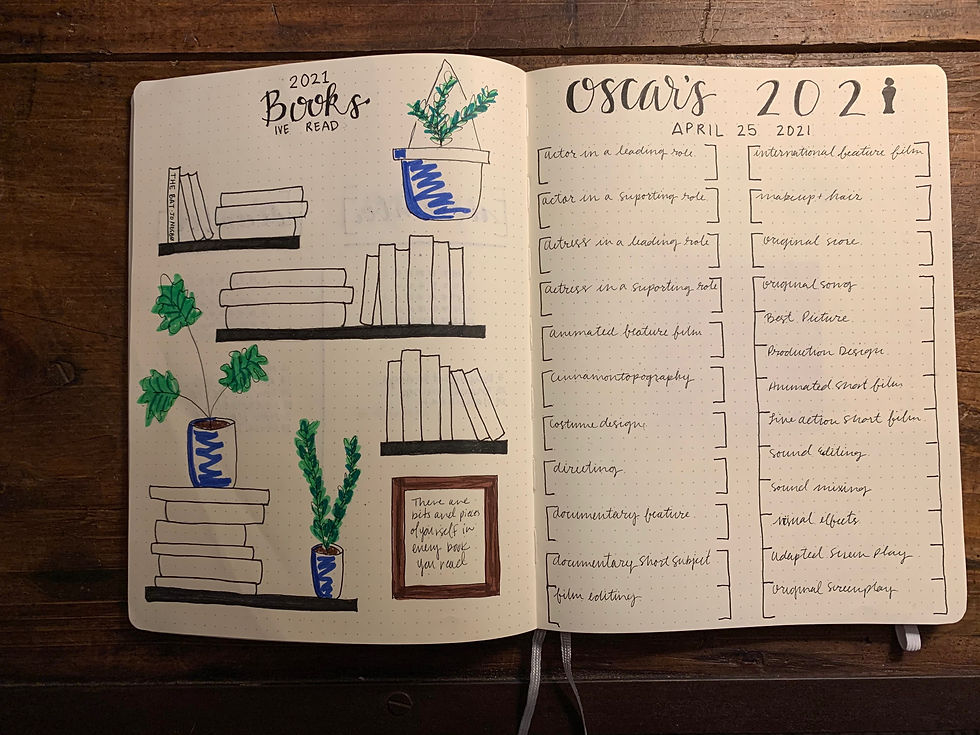
Next, I like to add in the trackers or inspirational pages, before I get into the year. On the left is my book tracker. I used a Uni-ball vision fine tipped black pen and then Shuttle Art dual tipped brush markers on this page. The right page is an Oscars Ballot. My friends and I like to make the Oscars competitive, so on this page, I can record my guesses and then the results. I used Pilot G-2 .05mm for the smaller font for the categories and then a Uni-ball vision fine tipped black pen for everything else on this page.
The next page is my stamp collection. Stamps are a new bullet journal material that I am trying out this year. So far, I like what I see. I got my stamps from Amazon, including an entire alphabet collection in a typewriter font.

Then I included a six page movie tracker. I’m being a bit ambitious including six pages but I’m hopeful that life will return to some kind of normalcy which will allow us to go back to movie theaters. The ones I see in theaters will get a colored in popcorn on the left hand side. Again for this page I only used a Uni-ball vision fine tipped black pen.

Finally we get to setting up the calendar part of my journal. I like to start off this section with a welcome page for the year which includes page for setting up goals. I haven’t finished writing all of them out here. On these pages I used a Pilot G-2 .05mm pen for the thinner lines and Uni-ball vision fine tipped black pen for thicker lines as well as the shading, but the “read more!” and the mason jar in the corner were both made with stamps.

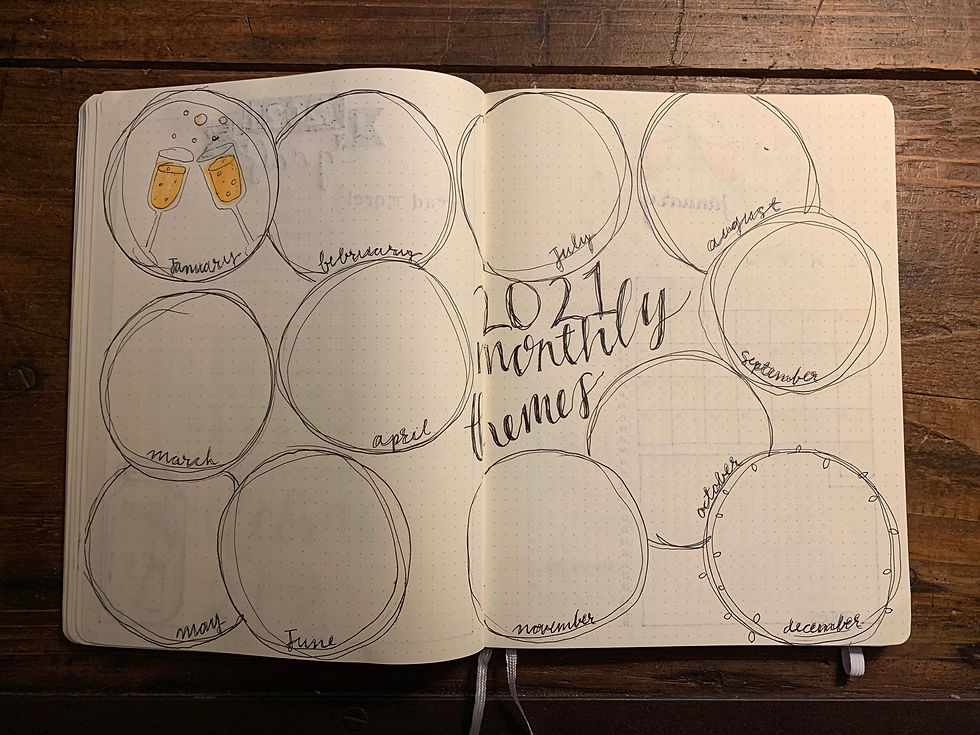
This next page is a new addition to my bullet journals—a monthly themes planner! Here I can provide a sneak peek for what each month’s pages will look like since I like to switch that up. I used a small mason jar to trace the circles and then a Pilot G-2 .05mm pen to go over them, then a yellow Shuttle Art dual tipped brush marker on the champagne glasses.
And next is January! I like to start off each month with a welcome page that includes an overview of the month, a section for goals, and a sleep log. This month’s theme was inspired by the arrival of the new year. All month long I will be toasting the new year and saying good riddance to 2020 with this fun champagne theme. On these pages I again used a combination of Pilot G-2 .05mm pen, Uni-ball vision fine tipped black pen, and Shuttle Art dual tipped brush markers in two different shades of yellow.

This next page is also a new addition to my bullet journals—a monthly mood tracker. I used to include a year-long mood tracker in the beginning of my journal before the calendar section started but I didn’t do a good job of following up on it, so I wanted to put it with each month so that I see the tracker more often and am reminded to log how I was feeling each day. The mood tracker paired with the weekly spread also helps me remember what I was up to and how it made me feel each week. On the right side of the page I have the beginning of the weekly spread for January. On these pages I used a combination of the Pilot G-2 .05mm pen for thinner lines, a Uni-ball vision fine tipped black pen for filling in letters, and six different Shuttle Art dual tipped markers in various champagne colors.

I also wanted to give you a view of the weekly spread on two pages, showing a whole week. I used a Uni-ball vision fine tipped black pen for the thicker daily outlines and a Pilot G-2 .05mm pen for the days of the week and to outline the champagne glasses. I then used a champagne colored Shuttle Art dual tipped brush pen to add pops of color to the glasses.

And with that, there you have my bullet journal set up and January spread for 2021! Thanks so much for following along in this post and if you have questions or just want to comment, feel free to do so below this post, or under the “contact” section on the home page of my site. If you liked what you read and saw and want to follow along with me all year long, then head up to the top right hand corner and create an account to subscribe to my blog. Then, you will get email notifications whenever I post a new article.
I hope that your new year is filled with inspiration, motivation and joy.
Until next month…
Xo,
Madison
Commentaires